Pages

Thursday, January 19, 2012

A Gift for Granna

As Little Dinosaur is getting older (just turned 3), we can start being more creative with our handmade gifts for family and friends.  Granna's birthday is the first event every year, so we decided to make these pretty placemats for her.  

Supplies needed: 
• one or two colors coordinating fabric (prewashed)
• various colors fabric paint and paint brushes
• Contact paper
• newspaper (to protect painting surface)
• sewing machine and matching thread


First I cut the fabric into rectangles (4 of each color).  I used one of my large placemats as a template.

The next step I folded and cut the contact paper as if making paper snowflakes. Here is a great video link to demonstrate. Then I centered the snowflake in the middle of the fabric rectangle. To add an extra detail, I took four matching pieces from the cuts and centered them on each corner. If you do this, remember to place them well within the edge of the fabric to allow for  finishing the edge after painting.

Give your faithful assistant the paintbrush.

and instruct them to paint over the white "stickers"

I helped Little Dinosaur be sure to cover all the areas to get a good print.  I let him pick the colors he wanted to use.  I rinsed the brush in a dish of water, and tried to keep him from mixing the colors too much. (Of course that is his favorite thing to do when painting)  Little Dino did get into the water and this caused the paint to bleed into the fabric some. I don't mind that - it adds that special "made by a three-year-old touch." On the very last one, Little Dino picked a glittery gold color to use.  I really liked how that added some flare to the placemats, so I added a bit to the other three he already painted. (I would have had him do it, but he was already on to playing with trucks and trains.)

I laid them out to thoroughly dry overnight. Then I removed the contact paper templates.


Here is the front and back view.

To finish the edges I used the bright orange to back them. (I liked the more polished look, rather than having the back show the paint that bled through the fabric.)  I sewed a seem all the way around about a 1/4" in from the edge to attach the front and back pieces. I decided to fray the edges, which was easier for me than a finished hem.  Here is a link if you are interested in finishing the edges smoothly. (Mitered Corners)

These were really very simple to make, and a great project for kids to participate in gift making.  A little bit older kid would probably enjoy helping to fray the edges of the fabric as well. We packaged them up along with a handmade birthday card for Granna.  Hopefully she will enjoy using them as much as we enjoyed making them.

Sunday, December 18, 2011

A Race Car Birthday

We recently celebrated Little Dinosaur's third birthday.  It was very exciting  to have Granna here to celebrate with us. Little Dinosaur is all into anything cars, trucks, and flying things.  Granna and I thought a race car birthday would be a great idea for a three-year old party.

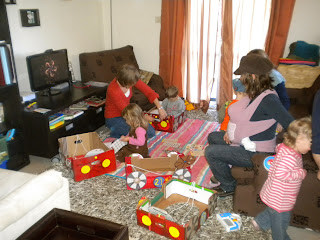
We got to planning and started coming up with such cute ideas that I just had to share them. Our main activity was to make box cars for each child.  The idea was to decorate them and then go outside and let them wear the cars to race and play Red Light/Green Light. (The kids had a blast decorating them, but in the end didn't want to wear them outside - maybe it's a better idea for 4 or 5 year olds).

We found six fruit crate boxes in the recycle bin along the bike path near our house.  I spray painted them red. (1 can of red spray paint just put a red tint to the boxes, you would need 2 or 3 three to thoroughly coat the boxes.)  Then my mom cut tires, steering wheels, headlights, and license plates out of cardboard. We used a glue gun to glue the pieces onto each car and attached the steering wheels with a pipe cleaner. Finally, we added rope to make straps.  We tied them in a way to make them somewhat adjustable for each kid's height.
Here is the rear view with the license plate. (We used each child's name as the license plate.)
We also added racing numbers on each side.
(To make it a little more unique the number is the age of each party guest in months.)

Here are all six cars ready to be decorated.

We had lots of stickers ready for the kids to decorate their race cars. They really enjoyed this.
We had a wide age range, so the stickers made a really great activity that all ages could enjoy.


Next we took the cars outside for the kids to enjoy.

One of our guests was gracious to pose for the picture in her car, but as I said they were more interested in racing and playing Red Light/Green Light without wearing their cars.

After a bit of running around, we went back inside for snacks, cupcakes, and singing Happy Birthday. Granna iced simple yellow cake cupcakes with chocolate frosting and we added little plastic race cars and traffic signs to top them off.


Next was gift time, so we let Little Dinosaur open his gifts and then handed out his 'goodie bags' to say thank you to all his friends. I think I had the most fun making these cute little car boxes as our goodie bags.

I found this link online to make origami boxes.  I used scrapbook paper (already conveniently square shaped for origami). I trimmed about 1/2" off two sides of the piece to make the bottom slightly smaller than the top. This way the bottom fit neatly inside the top. (In hindsight, it might have been better to do this the other way around.  The tops kept slipping off the boxes, so we had to hold them from the bottom. Although they wouldn't have looked quite so finished that way, or maybe we could have just added a little piece of tape on each side to secure the tops and bottoms.)


Then I glued foam circles in a complimentary color on the from of each box for the headlights. Granna made a license plate for each car, and she wrote the names of each child on them. Then we found coordinating bottle caps to glue on the sides for the tires. (I had a good collection of caps, but we did have to make a trip down to the recycle bin to find a few more.) I just love how cute they turned out. We filled the boxes with a cute little love bug craft, some race car stickers, a mini candy bar, and a Disney Character chocolate egg. (Found them at our grocery store, they are like KinderEggs, except they have disney characters inside. We gave Disney Princesses to the girls, and Cars characters to the boys.)

We let the kids have a little free play time and that was the party. It was lots of fun, and I'm told by several parents that their kids are really enjoying playing with the box cars at home.  Hope you enjoyed it. Have fun!